Saturday, October 13, 2018

October Hostess Club Layouts (Boutique)

Hi Everyone!!

Hope you are enjoying the beginning of the fall season!!  Here are the layouts using Boutique!!

This is the hostess club layout.  I love this blue grey color and it pairs really well with eggplant.  The Relax is a stamp from "No Worries"  and the hearts are from the stamp set Happy Heart.  It's a lovely simple layout.  Also, we did stitching on the edge of page using lavendar shinhan marker.  This is a layout from Make It From Your Heart Volume 3, Pattern 16 page 36.  Photos may be laced in the grey area... any configuration that works for you.  The joy pml card comes from the paper pack and can be a flip flap!  Flip flaps are a great way to add extra photos to any layout!


The first layout of the Workshop Your Way is inspired by Chris Robertson.  This rich paper makes a very elegant layout.  There are three PML cards used on this layout, along with silver shimmer trim.  A great time for getting a thing strip of shimmer trim is to use the cutter.  Cut a piece of shimmer trim, removed the backing and place it on the paper trimmer trying to center it... then use the blade to cut up the center.  Also, if both pieces aren't used, move the thin piece to the another place on the trimmer till it's needed. 


The second layout is inspired by Maureen O'Sullivan.  This layout is just lovely!  Beautiful Moments is from the complement set and is the perfect words for this great layout.  The light green is actually glacier cardstock.  Again a PML card from the paper pack is used as a flip flap on this layout.


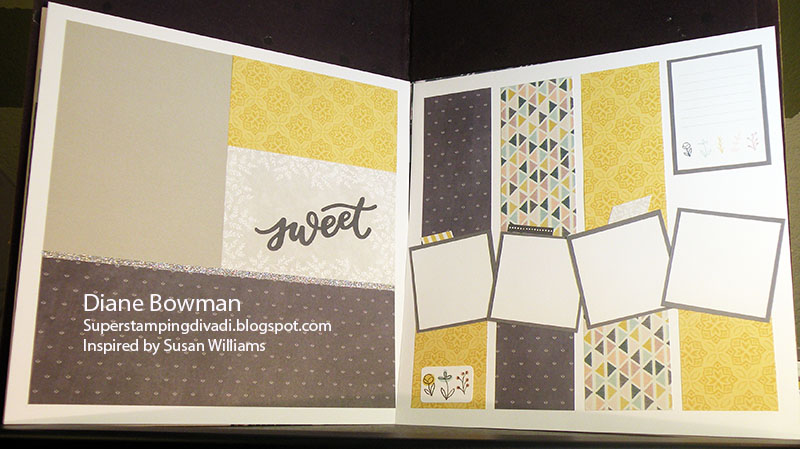
This layout is inspired from Susan Williams Heartstrings layout.  There are so many wonderful colors in this paper pack.  This layout featured saffron and linen.  Sweet is another complement and it's placed on a PML card.  This could also be a great place to add a flip flap.  Also, another thin strip of silver shimmer trim is used on this layout.  


Peacock is such a rich color!!  Here's another great layout... Inspired by Kelly Baxter Fitzgerald. The 3x4 photos could easily have flip flaps added for more photos!   


The final layout is really one of the most versatile layouts... it is easy to add flip flaps, 4x6, 4x4, 6x12, and the can easily add the pocket plus pages.  The 6x4 polka dot paper, would make a great spot to add a 6x4 horizontal flip flap as well as the light grey under the polka dot paper.  Also, this layout would easily lend itself to other collections.  Another fun thing with this kit, are the puffy stickers.  This layout was inspired by Linda Caler.


The next class will be Tuesday, November 13... doors open at 5:00 PM.  The Workshop Your Way will be Hello Pumpkin.  Please order this kit by October 31.  Come join the fun!!  Want to try it out... come by and do the Hostess Club layout.  

Friday, October 5, 2018

October Shoebox Cards

Hi Everyone!

Hope you are enjoying the Fall!!  Even though it's been cold and rainy, here are some things to cheer your spirit!  We had a great time and cards and welcomed a new person!  Beth, we were so excited to have another card person join us!  We hope you join us in November!!

This is a super fun and easy treat bag!  Thanks to Michelle Johns for the inspiration!  
This uses the September SOTM Just Treats.  It actually holds quite a bit too.


Here are the quick directions... base 7.5x5.5 and the B&T paper is 3x3 (2).
with the 5.5 at the top of your scoreboard, score at 1 and 4.5
Then with the 7.5 across the top, score at .5 and 4.  Then score to the 1 inch line at 2.25 and 5.75.  Next, score from the 2.25 diagonally down to the 1 inch border on both sides, making a triangle.  Do the same thing on the other side.  (refer to the drawing below).

Then cut away the .5x1 in the top and lower left corners.  cut on the top three score lines (this is actually the bottom)  Next the .5x 3.5 will be the flap.  fold it in and then fold the base in half.  Use liquid glass to adhere. 

Now to decorate.  Take the 3x3 and mark the middle (1.5) cut from the middle to the corner on one side and then do it to the other side.  All three pieces are needed to decorate.  Repeat this step with the other piece.  If using two sided paper, you can alternate the patterns.  Next adhere the paper to the appropriate areas.

And now, it's time to work on the base.  Fold the bottom pieces together (2 & 2) use liquid glad to adhere this part too.  It helps to use a scoring tool or a long thin block to help get the base to hold and stay flat.  

Next add any decoration or greeting.  The circle worked really well for this.


Anita's fabulous card features fun spider paper.  It's diagonally half of an 8.5x11 sheet of card stock... carefully fold the top down, then finesse the left side in.  (notice that the left side has the base along the bottom.  This allows the card to stand up.  The center has an embossed web (after stamping Happy Halloween) and the spider is cut from a ring.  One other tip that she shared with place the medallion where you want it, lift the card open and draw a line so that adhesive is only put above that line.(adhesive only part of it, so that the card will still open)


We also decorated the inside!!  What fun!


Here is Beth's first card with us!  It's so elegant! The city scene is on watercolor paper and is a little thicker.  We double mounted cardstock for a bit of strength, then we added the pink floral to the edge of the black.  We added the city scene behind the pink frame and then attached the pink frame to the black card base.  We used a marker to color the skirt and shoes of the young lady and then used a waterbrush to pick up some of the marker for the umbrella.  Beth had used a the lady cut out and on a strip of xyron for easy application.  We scribbled the marker on the xyron and used the water brush to pick up the color for the umbrella.  then we added the black strip, starting on the back and folding it over to the front and added our sentiment.  Lovely card Beth!!


Julie's franktastic card has a 3-D element. Here's the front.... 


and here's the 3-D effect.  She had all the pieces cut and lined up.  It was a little tricky, but I love the Frank cut out in the middle and it almost feels like a book.  We added some super fun ribbon and It's looks great!!


Julie had two cards tonight... This one is a birthday greeting ... She used embossing folders for the half of the card.  This is the perfect embossed for this card!  


Layer two... it's important to have put one layer down first and then match the other layer on top.  I love the fall scene with the leaves and the pumpkins.  We added lines for definition.  The inside of the card says happy birthday.


Kathy's card features a fall vignette.  It's a 6x6 card with a fun edge.  We did some direct to paper distressing and used deckle scissors to edge the scenes.  The leave on  top is also distressed and raised with a popdot.  Nice card Kathy!!


Melani's card greets us with black and grey spiders webs.  This was a quick and clean card and the webby paper makes it a little spooky!!


Roxxy's card has a great spooky tree embossed on it.  We stamped the tiny spiders around the edge and added the metallic boo, the ghost and the pumpkin has a metallic piece behind it and is lifted in front of the ghost!  Such a nice card design.  We decorated the inside too, but it didn't photograph well for some reason.


Those are the fabulous October cards!  What a fun night... lots of chatting and giggles!  it was great to have such a nice group!  We did miss our Shannon though!  Come back soon Shannon!!  Join us for the next card night on Tuesday November 6!!