Saturday, March 12, 2016

March Hostess Club

We had so much fun with Penelope for this month!!  

This is the Hostess Club layout for and we used the bulk papers and the washi tape as well as some of the PML cards that came in the pack and added some of the fun vellum pieces!!  This Fabulous layout was inspired by Chris Robertson!

One great tip for splitting the washi tape is to put the washi tape on a one inch strip of white cardstock and then cutting it at 1/2 inch.


The girls made very similar layouts!!  What fun!!

Here's Sweet Pam's Layout!!


And here's Theresa's lovely layout!!


And Kathy came and joined us, but she did her own thing... she was doodling!! Always glad to have some fun on Hostess club and workshop night!!

Next month we are going to work on Georgie!!  join us!!  Tuesday April 12th doors open at 5:00 pm!!

D~

Tuesday, March 1, 2016

March Shoebox Cards

Hi Everyone!!

It was 45 degrees out yesterday and it snowed last night... That's almost an April Fool.. a month early... tee hee!!

So glad we had a great turn out tonight!  (We missed Anita though...)

Here are the fun creations from tonight!!

My card was inspired by Julie Carriere... I really wanted to do a hemp flower on there... but wasn't quite sure how to do it. So we used the embossing dots folder (after the washi tape was applied)... Washi tape across the bottom, hole punched on the side to hold the hemp as well as stapler (love that Stapler!!).  Used the Art Philosophy cartridge for the sentiment (two pieces) and a layer of kraft paper to complete this fun card!!


Julie's Fun card featured a leprechaun!!  It was fun to put this card together and we all giggled as we did it!!  

Who needs some March Magic!!  


Kathy used the Artiste cartridge to create this bunny box!!  She also gave us two roses to add to each side and pink glitter eyes... but we needed to put something inside before we decorated so we will add those at a later date (there is a slit that goes over the bunny that isn't wide enough to accommodate the extras on the bunny... so fill it first... then decorate!!)

What a fun way to share an Easter morning surprise!!


Lori's lovely card features embossed honeycomb and we used green and yellow markers to color the flower stamp and the greeting!  Love the bee stickers!!  So very cute!!

Just a great card!!


Melani taught us to do a stand up 3-D card!!  She stamped the elephant for us and we used dollar store make up to add color to him and then cut him out (lol most of us cut him out and then colored him) She mentioned that liquid glass would be nice on the tears.  We also stamped the dots all over. 

The base is 4x8 and we cut slits at 1.25 from 1.5-4.5 and then flipped it over and cut slits at 1.25 3-6 inches... then scored at 1.5 to the first cut line, at 3 from top to second cut line, then at 4.5 from the first cut line to the bottom and at 6 from the second cut line to the bottom.  The folds are all mountain first and valley second.

We raised the elephant by putting pop dots on the middle section to keep the adhesive floating where it needed to be.  Also, beware of putting adhesive on the back piece only when adhering to the 4.25x5.5 background.

Love this 3-D effect


Roxxy shared this darling Easter card with a blue bunny crawling into his tree hole.  The background is an wood embossing folder.  We used a xyron to glue the leaves and added a darling cotton ball for his tail!  Adorable!!


Shannon's super cute Hello Kitty Card! the bow is made out of two hearts and a circle!!  Such a clever idea!!  Hello is the purrrrfect greeting for this fun card!!  
We added some whiskers and a pretty pink purrrl for a pop of glitz!!  

Super sweet!!


Another Great night of card making!!

Thank you for coming and sharing your amazing talents!!

Let's meet again on Tuesday April 5th!!

D~

Thursday, February 11, 2016

Charlotte

I love the new expressions and here's the first kit using the new workshops your way!!

It's called Charlotte!  and it's soft and subtle and very nice.  I really enjoyed working with it.

Here's the three layouts from the workshop!  

Also there is a PML page and a set of cards to go with it!  (will be posting those later)


The new kits are packaged a little differently... the paper packet consists of 12 sheets of b&t papers.. (2 sets of 6) double sided.

The WYW (Workshops Your Way) includes:
X7205B paper packet
X7205C complements
3 extra sheets of cs (1 black and 2 whisper)
Z3197 Black and Gold ribbon
Z3203 Treasured Puffies
G1104 $26.95

All of these items can be purchased separately as well.. 
My favorite is the Treasured puffies!!

Another new feature is that the instructions for completing the projects is available online!!  There are couple of ways to find them... go to my OBA (Online Business Account) 
http://stampingdiva.ctmh.com/
go to products (select workshops) 
Choose the kit, click on layouts, then click on THIS GUIDE.

or click here and it will take you to the kit and you can click the download button.
It can be printed out or just used via your phone, ipad or computer for quick reference.
Also, easy to do from home!!

With this kit, CTMH also introduces Thin Cuts!  It's used to cut out stamped images on your cuddlebug or big shot.  

The stamp set C1641 Springtime wishes coordinates with thin cuts Z3201 and the Charlotte kit!  Makes it super easy to use Z3132 watercolor paints to color and then cut them out with the thin cuts.

It was quite easy to use the paints, and the thin cuts to create a lovely card.  The paint dried quickly too!!

Consider joining us for our next adventure with Penelope in March (Tuesday March 8th)

Also, we will have a crop on Saturday March 12th 9am to 9pm!! $10 please rsvp.  Includes lunch.

D~


February Hostess Club

Welcome February!!  Hoping that it's an early Spring!!

For February we are working on the Charlotte Kit!  Featuring the new Workshops your way!

Here's the hostess club layout that we did tonight...


This layout is very soft... but I really like it.  The bulk B&T paper has very subtle flowers on it with a little bit of sorbet.  This would be great for weddings, babies, black and white photos, and family.  

This layout was inspired by Lynn Como.. and also, I used the leftover sticker for the word lovely... and added a few more stickers here and there for fun.  


Here's Theresa's version of this layout!!  with Pics!  Nice job Theresa!!


and here is Pam's Layout!  She loves these quick layouts!!

Next club will be Tuesday March 8th!!  We will be working with Penelope!!  

See you then!!

D~

Wednesday, February 10, 2016

Februay Shoebox Cards

Hi Everyone!  Hope you are doing well!!  I am so excited to share this month's cards with you!!  And thanks to everyone who comes and shares their talents with us!!

Well, after missing the first Tuesday due to weather... we met on Monday!!  Yeah thanks everyone for adjusting your schedule to come.  Hopefully the weather in March will be much better and warmer!!

Next class will be Tuesday March 1st!!

Here's my card... Inspired by Stamp N Fun Debi


This card features a favorite retired stamp set D1548 Whoo's your Valentine and a loved favorite D1482 Love Life.  Cranberry and black.. simply elegant!! And a little bit of Black Shimmer Trim add some sparkle.  (side note.. the shimmer trim was cut in half).

And here's what everyone else did::


Anita taught us to do a standup word/letter card and I love how it's cut out and is still strong enough to stand up on it's own!  It was fun to bling it up!  (with lots of great bling)!!  
Wow can't wait to try this will different letters.. like MOM or DAD!!  What fun! 
The card base is 3.5x10.5 and scored at 3.5 and 7.  The letters were cut out of B&T paper and then mounted onto another piece of cardstock with a slim outline and then adhered to the card base.  Important to note... the base is not cut to give the card more stability.


Dulce's fun card was quick and easy.. but super cute and had us all giggling as we put on the fun googly eyes.  The teeth are a pennant border punch, but teeth could have been made out of triangles, square and half circles.  the card size is 4.75x6 and scored at 3.5.  Would be fun for valentines day... or halloween or birthdays... 


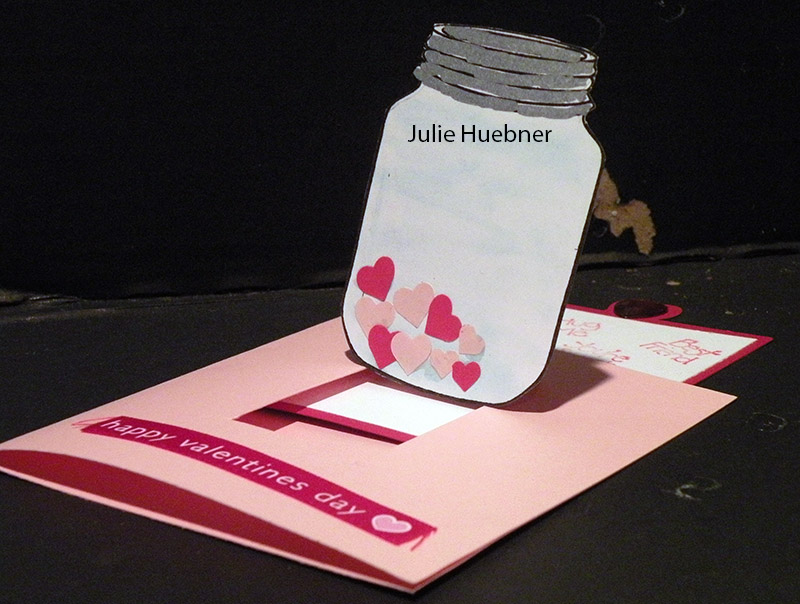
Julie's delightful card is a slide up!!  and when the heart tab is pulled, it reveals messages and the jar stands up.  We tinted the jar with chalk to give it a blueish appearance and used a silver sharpie to color in the lid.  The hearts were punched out and glued.  Darling!!! We made a slit 1.5 from right edge cut from 1.25 to 3.75 and move to 2.75 from right edge and cut again 1.25 to 3.75.  Cut across the 1.25 between the cuts and fold tab in half and add additional tab to attach to inside slider.


Lori wasn't able to join us, but brought cards for us to do and the most amazing cookies.. maybe green apple jolly ranch cookies.. I loved them and want the recipe!!  anyway... we had two choices... pink or purple and the purple people were appreciative!!  LOL...  Love the chevron print and the doily!  So clever!!


Melani's card was a bit challenging... we had to slit our cards starting at the half inch mark and cutting .25 to 4 every quarter inch (19 slits) and then weaving .25 inch strips of paper/cardstock through according to directions.  may glue ends down and also put a bit of glue in the middle of the front to hold down the longer ones.

I did the one for Lori and so created this one after for myself.  I really enjoyed this card!


Roxxy's card was quick and fun.  the paper comes uncolored and we added chalk to the paper for a pop of color, added some lovely ribbon, a fun butterfly cutout and a few sparkles for an elegant card suitable for most occasion... birthday, love, thinking of you or even sympathy.

Roxxy also brought the most amazing cupcakes... made out of chocolate in wonderful flavors (raspberry, salted caramel, cafe, lemon, almond).. I may or may not have had three of them!  they were divine!!  almost too pretty to eat!  LOL!!


Shannon was unable to join us as well due to a sick child... but she sent her card as well. Julie shared a fun story about the texture... Shannon was at Julie's house and discovered her embossing folders... and played on the floor with them for an hour or so... we all had different textures on our cards, but had the same embellishments.  I loved the heart washi tape!  The inside greeting ... and it lead me to you.  So sweet!!

Well we had such a great time and thank you all for coming and sharing your creativity, your stuff and your time!   
Have a great February!
See you March 1st!!

D~

Monday, January 11, 2016

December Hostess Club

We had fun getting together before Christmas and here's our layout!!


This lovely layout was inspired by Liz Johnson and can easily be embellished with the complements that come with this kit!

Here's what my clients created!!


Here's Dulce's layout!  I think she's ready for spring!!


Here's Theresa's layout!!  She's working on her son's album!!  

and somehow, I missed Pam's layout... Hopefully she will bring it back so that can be fixed!

Our next hostess club, Kathy is hostess and will be Tuesday January 12th and the doors open at 5:00 pm.

See you soon!

D~

White Pines layouts

Hi everyone!!

Here are the layouts that we created for the White Pines WOTG and Hostess Club

Here's the first layout.  This was the hostess club layout and uses the White Pines B&T paper.  It was inspired by Liz Johnson's amazing layout.  She also added the complements on her layout and it is so cute!!  Because this is the hostess club layout, it does not use the complements... but feel free to add them


This layout is based on the corporate layout!  
We added berries with punches 
and 1/2 inch circles cut from the cricut cartridge.


This amazing layout was inspired by Julie Carriere... 
Love the blues and browns.  
The snowflakes are cut from the Artistry cartridge.


This last layout was inspired by Dana Kessler 
and is just plain fun!! It has lots of room for photos!!


Hope you enjoyed these lovely layouts!!  I wasn't fond of this kit at first, but after working with it, I have really grown to love it and hope you have too!!

Happy Scrappy!!

D~